Create a workflow
In this section we will create the example workflow described in Workflow: a step-by-step walk-through.
- Swarm workflows can be created by any Swarm user.
- Shared Swarm workflows can be viewed by any Swarm user.
- Shared Swarm workflows can be applied to a project or project branch by any Swarm user that is authorized to edit the project.
- The global workflow can be viewed by any Swarm user but can only be edited by a Swarm user with super or admin privileges, or users that have been made an owner.
Add the example workflow:
- On the Swarm Workflows page, click the + Add Workflow button.
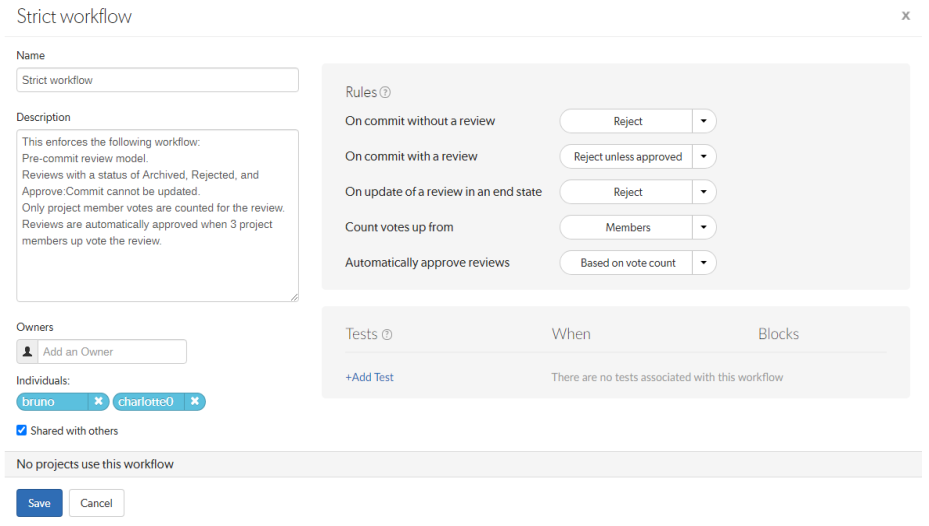
- Enter a name for the workflow:
- Optional: provide a description for the workflow.
-
Rules: Set the workflow rules as follows:
- On commit without a review set to: Reject.
- On commit with a review set to: Reject unless approved.
- On update of a review in an end state set to: Reject.
- Count votes up from set to: Members.
-
Automatically approve reviews set to: Based on vote count
TipThe Minimum up vote value is set on the project/branch the workflow is associated with.
TipThe protected end states are globally set by your Swarm administrator, the default protected end states are Archived, Rejected, and Approve:Commit.
-
You are automatically added as the owner of the workflow.
Optional: add more owners if required. This field auto-suggests groups, and users within Helix Core Server as you type (up to a combined limit of 20 entries).
Important- A workflow must have at least one owner.
- If you remove yourself as an owner, you cannot edit this workflow configuration later unless you have super user rights.
-
Optional: if you want other Swarm users to be able to use this workflow, select the Shared with others checkbox.
TipLeave the checkbox unselected until you have proved that the workflow rules work as expected. This keeps the workflow private and stops other Swarm users using the workflow until you are happy with it. Once you are happy with the workflow, select the checkbox to share the workflow with other users.
- Tests
- Tests are only saved on the workflow when you click the Save button.
- If a review is associated with multiple workflows, all of the tests on all of those workflows are run for the review. If the same test is on more than one of the associated workflows, it is only run once.
- Click
 in the Tests area.
 - Select the test to run from the Tests dropdown list.
- Select when you want the test to run from the When dropdown list. Tip
Review content change is when the files or content of files in a review change. A change to the review description does not trigger a test.
On Demand tests are unaffected by the review content change check.
- On Update the test will run when:
- a review is created.
a review is submitted and the review content has changed compared to the previous review version.
- a review is updated and the review content has changed since the previous review version.
- On Submit the test will run when a pre-commit review is submitted or a post-commit review is created.
- On Demand the test will not run automatically, but you can run it manually from the Tests dialog on the review page.
TipIf the review content has not changed since a test last successfully reported a pass, it will not be re-run when a review is versioned or submitted. If a test is still running or has not updated Swarm with a pass state, it will be re-run, even on a submit.
- Select whether Swarm blocks approval if the test fails from the Blocks dropdown list:
- Nothing if the test fails it will not block approval.
- Approve if the test fails it will prevent the review from being approved.
- Click the Accept
 button to add the test to the workflow.
 - Click the Edit
 button next to the test you want to edit.
 - The Test, When, and Blocks dropdown lists are displayed for the test.
- Make changes as required.
- Click the Accept
 button to confirm your changes.
 -
Click Save.
NoteThe Save button is disabled if any required fields are empty.
- Now that you have created a workflow associate the workflow with a project, see Add a workflow to a project/branch.

Optional: add tests to the workflow, the tests are run when a review associated with the workflow is either created/updated or submitted. Selected from the When dropdown for the test.
Add a test:
Edit a test on the workflow:
Remove a test from the workflow:
Click the Delete  button next to the test to remove it from the workflow.
The test is removed immediately, no confirmation is requested. You must save the workflow to complete the test removal.


