Searching and filtering
You can search for files, changelists, workspaces, branch maps, streams, jobs, and labels using filters. Each of these has its own filtering procedure, but there are many shared search and filtering tools, which are described here.
Find files in a depot or workspace
To find a file in the depot or in your workspace:
-
Go to Search > Find File. The Find File tab opens in the right pane.
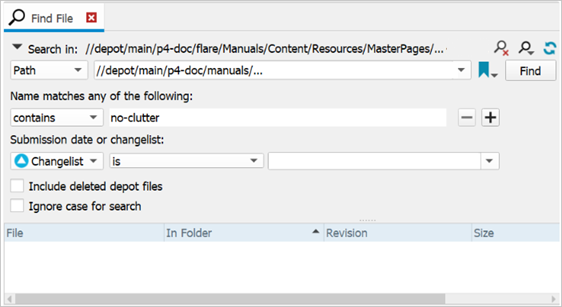
- On the Find File tab in the right pane, under Search in, enter the directory path you want to search. You can drag and drop the file path from the Depot or Workspace Tree in the Tree pane.
-
Enter any of the following search criteria:
- Under Name matches any of the following, select an operator (contains, is, starts with, ends with) and enter all or part of the file name. You can add multiple name match rows.
- Under Submission date or changelist, enter a date, changelist, or range of dates or changelists.
- Select Include deleted depot files.
- Select Ignore case for search.
-
Click Find.
Click a file in the search results pane to view file details.
Find a file, folder, or item in the active tab
-
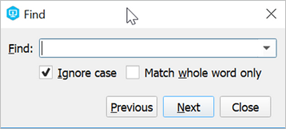
Click Search > Find or type +F (Windows) or +F (Mac). The Find dialog opens.
-
Enter the search term in the Find dialog.
You can enter any part of a search term to retrieve results, unless you select Match whole word only. To search in a different tab, you must close the Find dialog, go to the new tab, and reopen the Find dialog for search.
Find specs using filters
You can use filters to find specific labels, submitted or pending changelists, workspaces, and so on. These items are also referred to as 'specifications.'
Some fields may not be visible unless you expand the filter pane manually.
To enter filter criteria for most specification types:
- Click the Filter disclosure triangle
 in the upper pane of
the specification tab (Submitted, Jobs, Labels, etc.) to expand the filter pane.
 -
Enter your filter criteria in the appropriate fields.
Use the following buttons to add or delete filter rows:
- To add conditions, click the plus
 button.
 - To remove conditions, click the minus
 button.
- To add conditions, click the plus
You can save and reuse filters, and you can also use the Search menu to initiate searches and select saved filters.
For more information about how to find and filter each specification type, see:
- For changelists, Checking in files
- For workspaces, Creating and managing workspaces
- For branch maps, Managing branch mapping
- For streams, Using the Stream Graph
- For jobs, Managing jobs
- For labels, Managing labels
Customize Depot and Workspace views using filters
You can apply filters to your Depot and Workspace views to hide or show certain files and folders.
To customize a tree view:
-
Do one of the following:
- Click Search > Filter Depot or Filter Workspace.
- On the Depot or Workspace tab, click the filter icon
 .
.
-
Select one of the following options:
Option Description Depot tree Show Deleted Depot Files Select to display files that have been deleted from the depot at head revision. Hide Deleted Depot Files Select to hide files that have been deleted from the depot at head revision. Tree Restricted to Workspace View Select to display only folders and files defined in the workspace. Entire Depot Tree Select to display the whole depot tree. Tree Restricted to Depot Type (<selected value>) Click to open the list of depot types, and then select the depot type to display (Local, Stream, Spec, or Remote). By default, P4V shows the whole depot tree (Entire Depot Tree). Tree Restricted to Stream Type Only available if the depot type selected is Entire Depot Tree or Stream. Click to open the list of stream types, and then select the stream type to display (Mainline, Development, Release, or Task). To clear the selection, select No Filter. Note that this option also displays directories that are no longer associated with a stream spec. To show all stream types and hide directories that are no longer associated with a stream spec, select All Types. No Folder Filter Select to clear a folder filter (only applies if you have a bookmark selected). <path to bookmarked folder> Select to display only the bookmarked folder and its subfolders in the depot tree. Workspace tree Show Files Not in Depot Select to display files that only exist in the workspace, not in the depot. Hide Files Not in Depot Select to not display files that do not exist in the depot. Show Only Files Not in Depot Select to display only files that do not exist in the depot. Show Hidden Files Select to display any hidden files. Do Not Show Hidden Files Select to keep hidden files from displaying. Entire Computer Select to display the entire computer folder hierarchy. Workspace Root Select to display only the workspace root. The tree view refreshes to reflect your selection.
Save and reuse filters
To save a filter:
-
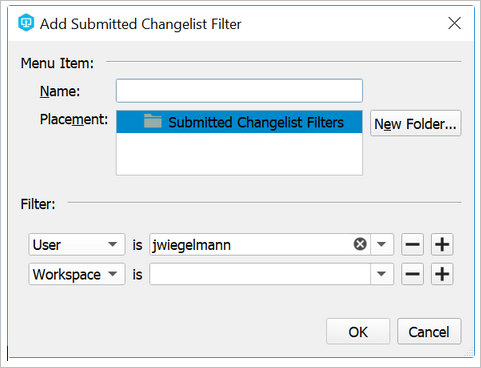
Open the Add Filter dialog by doing one of the following:
- In the filter pane, click the Apply saved filters
 icon and select
Save Filter.
 - Go to the Search menu and select Save <spec type> Filter.
- In the filter pane, click the Apply saved filters
-
In the Add <spec type> Filter dialog, enter a name and folder location for your saved filter.
- Click OK to save.
To apply a saved filter:
- In the filter pane, click the Apply saved filters
 icon or go to th e Search menu and select the filter type that you want.
 - Select a filter from the list.
To manage your saved filters:
-
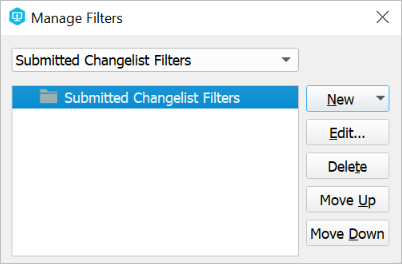
Open the Manage Filters dialog by doing one of the following:
- In the filter pane, click the Apply saved filters
 icon and select
Manage Filters.
 - Go to the Search menu and select Manage <spec type> Filters.
- In the filter pane, click the Apply saved filters
- In the Manage Filters dialog, organize your saved filters by adding, deleting, or moving filters and folders.
- Close the dialog to save your changes.
To clear a filter:
- Click the Clear filter
 icon or go to the
Search menu and select Clear <spec
type>Filter.
Filter with file paths
You can view jobs, changelists, or labels associated with particular files by entering the file path under Files match any of the following file paths in the tab’s filter pane, or by using the File Path Builder. You can enter either a depot or workspace file path.
To enter file paths directly into the Files match any of the following file paths field, do any of the following:
-
Use standard Helix Server file path syntax (
//depot/folder/folder/filenameor//depot/folder/...).You can use the standard Helix Server wildcards (* and …) and revision specifiers (@ and #).
For more information about wildcards and revision specifiers, see Helix Server wildcards in the Helix Core Command-Line (P4) Guide.
- Drag and drop a file path from the Depot or Workspace Tree into the field.
- Click the drop-down arrow to view and select recent file paths.
To get help constructing a file path:
-
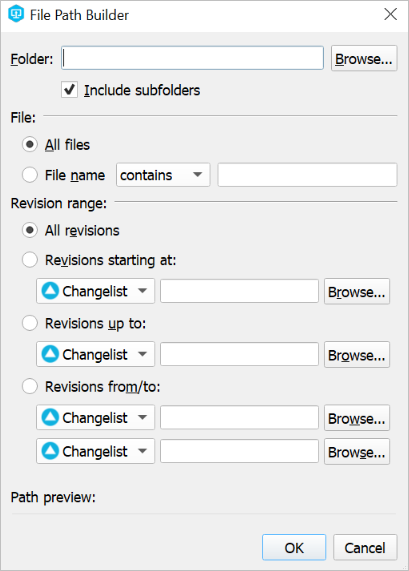
Click the Construct a file path
 icon to open the
File Path Builder.
-
Build a file path by selecting any one or a combination of the following criteria:
-
Folder path in the depot or workspace.
Click Browse to view the depot and workspace trees and select a path.
- File name or partial filename, using contains, is, ends with, or starts with.
-
Revision range:
- All revisions.
- Revisions starting or ending at a particular revision number, changelist number, label, workspace, or date/time.
-
Revisions ranging between two revision points (revision number, changelist, label, workspace, or date-time).
You can browse for changelists, labels, and workspaces.
As you enter or select values, the resulting file path appears in the Path preview: field.
-
-
Click OK.
The file path that you built appears in the Files match any of the following file paths: field.
All results that meet the search criteria appear in the search results window below.


