Transform Your Development with the Version Control Leader
P4 (formerly Helix Core) gives your global development and design teams a version control foundation for creating without limits. With an unrivaled ability to handle the expanding size and complexity of today’s projects. P4 can store and track changes to all of your digital assets—from source code to 3D assets—while enabling your team to collaborate like never before.
Scale Endlessly Without Sacrificing Performance
The largest technology companies trust P4 for its unrivaled ability to scale across multiple dimensions — the size of your team, the size of the assets they work with, and the volume of work they produce. P4 is the only source control system built to handle:
- Large individual assets over 100MB
- Project repositories over 10 TBs, and PBs of total data
- Thousands of concurrent users
- 10,000+ transactions per minute
- Global, multi-site topologies
Collaborate Globally with Best-in-class Security
P4 offers a data management system that eases collaboration. Protect your most valuable assets by giving team members, contractors, and partners access to only the files they need. Support highly regulated industries with these advanced capabilities and benefits:
- Granular access control down to the file level and by IP address
- Exclusive file locking with global lock visibility
- Content distribution server that protects your source code from 3rd parties
- Full audit history for traceability support
- End-to-end encryption
- ISO 26262 certified for automotive functional safety
Empower Your Development with Intelligent Workflows
P4 accelerates development and minimizes wait times through a powerful set of branching options and syncing capabilities you won’t find anywhere else. Lower your operational expenses and uncover hidden efficiencies with:
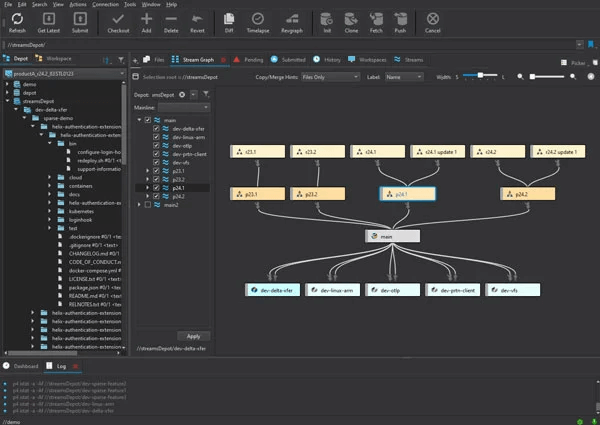
- Advanced branching models with built-in visualization (via Perforce Streams)
- Lightweight and instantaneous branching with Sparse Streams
- Virtual File Sync
- Delta Submits and Syncs of File Revisions
- S3 (and S3-compatible) Object Storage Support
Accelerating Innovation Across Industries
Top Use Cases of P4
P4 is the Perforce P4 server itself, and the industry standard version control platform for game development. Trusted by 19/20 of the top AAA game development studios, and award-winning studios large and small, P4 is extended and integrated into a gaming studio’s core workflows to provide a scalable source control foundation and single source of truth.
Game studios utilize our web-based code review tool to track code reviews, give feedback, and tailor the review process according to the pre-commit and post-commit models needed for each phase of game development.
Indies and AAAs alike utilize this intuitive digital asset management system to manage the specialized 2D and 3D file formats they work with. P4 DAM (formerly Helix DAM) makes finding assets fast and easy with AI-powered tagging, customizable metadata, and high-resolution thumbnails with native USD support.
For teams that need to use Git, our free P4 Git Connector provides a secure path for your developers to use their preferred Git tools (including GitHub, GitLab, and Bitbucket), while your art and design teams use a version control solution that won’t slow your studio down.
Game studios use P4 Plan (formerly Hansoft) to scope projects and manage their backlog, across a mix of development methodologies, as quick as they can type. With professional grade configurations and features, P4 Plan can be used across the lifecycle of your game development.
This is just the beginning. Every P4 user gains access to a powerful suite of free applications, tools, clients, plug-ins, and APIs, to optimize their development and their team’s core workflows.

P4 is the Perforce P4 server itself, and the industry standard version control platform used across industries. Trusted by award-winning studios like DNEG and Halon Entertainment, P4 is extended and integrated into a studio’s core workflows to provide a scalable source control foundation and single source of truth.
Film, television, and virtual production studios alike utilize our web-based code review tool to track code reviews, give feedback, and tailor the review process according to the pre-commit and post-commit models needed for each phase of their project.
Award-winning studios have award-winning IP they want to protect and reuse. P4 DAM is specialized digital asset management that works with the common 2D and 3D file formats used in the entertainment industry. Onboard your vendors and collaborators quicker, and give your artists one central place to find, review, and get feedback on every version of their creations.
For studios with engineering departments that prefer to use Git, our free P4 Git Connector provides a secure path for your developers to use their preferred Git tools (including GitHub, GitLab, and Bitbucket), while your art and design teams use a version control solution that won’t slow you down.
When studios need a professional-grade and robust real-time planning tool, they use P4 Plan. Scope projects at the portfolio and project level, and plan your resources and capacity as quick as you can type. P4 Plan even lets users link tasks to changelists with a native P4 integration.
This is just the beginning. Every P4 user gains access to a powerful suite of free applications, tools, clients, plug-ins, and APIs, to optimize their development and their team’s core workflows.

P4 is a high-performance data management solution that supports global semiconductor teams with storage, access, and versioning of design assets, including binaries, digital and analog design files, and IPs. It easily handles the millions of files that are common in EDA tools, along with the complex file relationships found in semiconductor designs. Global development teams benefit from P4's ability to securely manage all digital content in a single repository. With a robust caching and replication architecture, access for engineers and designers is seamless and nearly instantaneous — no matter where they are in the world.
P4 integrates seamlessly with Perforce IPLM (formerly Methodics), a comprehensive IP lifecycle management platform. With P4 and Perforce IPLM, global semiconductor design companies gain a centralized system for design management across all types of projects and platforms. Perforce IPLM helps large, distributed teams eliminate project-centric design silos to improve collaboration. With it, they can find and reuse IP more effectively, achieve end-to-end traceability to ensure regulatory compliance, and accelerate the release process with automated release flows.
P4 gives OEMs and suppliers the foundation of scalable data management necessary for accelerating global development. At a time when automotive software and systems developers face unprecedented levels of complexity, P4 enables them to improve collaboration, efficiency, and security by providing a single source of truth for all digital assets, from binaries and design files to IPs and Git source code. It effortlessly scales to handle petabytes of data, millions of files keeping IP safe with best-in-class security and meeting the industry’s highest safety, quality, and reliability standards.
Use P4 to streamline automotive development and design by adding data management to your existing tools. It integrates seamlessly with the most popular development tools, including Jenkins, Jira, Maya, and GitHub. Thanks to its tight integrations with Unreal Engine and Unity, it is the data management system of choice for teams using game engines for data-intensive projects like digital twins, visualization, HMI design, and other next-gen automotive technology.

P4 is the Industry Standard
Trusted by
19/20
Top AAA Game Dev Studios
82%
Rated P4’s ability to scale as “Best in Class”.*
100%
Realized a return on their investment within 2 years.*
Trusted by
9/10
Top Semiconductor companies
*Survey data gathered from 2023 customer survey.
Version Within Your Existing Tools and Workflows
P4 is specialized for your industry, with out-of-the-box integrations that let your developers, artists, and designers version in the background of their core workflows.
See Popular IntegrationsGet Started with Perforce P4
You can get started with P4 for free for up to 5 users and 20 workspaces.
Get Started with P4 Cloud
Designed for teams under 50, our Perforce-managed and hosted solution is only $39/user/month.
We’re Here to Help
Get in touch with our experts. They’ll walk through solutions that work best for you and your team.


