|
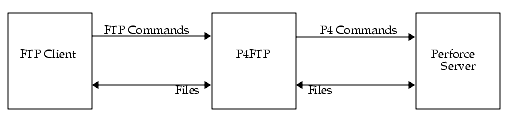
To install P4FTP, perform the following steps:
- Download P4FTP.
- Choose a port number.
- Start P4FTP.
- Optionally, configure P4FTP to start automatically when you reboot the computer on which it runs.
- Create Perforce users and client specifications.
After you perform these procedures, you can configure web authoring tools such as Macromedia Dreamweaver to use Perforce to store and retrieve your web site files. See "Configuring Macromedia Dreamweaver with P4FTP" on page 20 for details. The following sections tell you how to install P4FTP.
Downloading P4FTP
To download P4FTP:
- Launch a web browser and go to http://www.perforce.com/loadprog.html
- On the Perforce product download web page, find the version of P4FTP that is compatible with the platform where you intend to run it.
- Download the file to the directory where you intend to run it.
Note
|
Recommended installation directories are:
- Windows: C:\Program Files\Perforce\
- UNIX: /usr/bin/ or /usr/local/bin/
|
Choosing a port number
P4FTP is a modified FTP server. Its default port number is 21, which is also the default port number for standard FTP servers. To avoid port conflicts, you can assign a different port number to P4FTP when you start it, as follows:
Starting P4FTP manually
To start P4FTP manually (that is, from the command line), perform the following steps:
- Login as the user that you want to run P4FTP.
UNIX
|
If you want to run P4FTP on a privileged port (a port number lower than 1024), login as root. The default port for standard FTP servers is port 21.
|
- Windows users: open a DOS window.
- Run p4ftpd.
When starting p4ftpd, you can specify the host and port number of the Perforce server you want to access, and optionally the port on which P4FTP accepts FTP commands. For example, to start p4ftp with its default port (21) on the same computer (named perforce) where the Perforce server is running on its default port (1666), issue the following command:
To start p4ftpd on port 1232 communicating with a Perforce server running on port 2343 on a remote computer named bigcomputer, issue the following command:
p4ftpd -p perforce.bigcomputer.com:1232 -l 2343
By default, p4ftpd submits changelists with the following description:
[P4FTPD] Automatic changelist for uploaded files
When you start p4ftpd, you can override the default description using the -t flag. In the description, you can specify the following macros, which are expanded when the changelist is submitted
Macro
|
Expands to
|
|---|
|
%user%
|
user name
|
|
%client%
|
client name
|
|
%ftphost%
|
host name (p4ftpd host)
|
|
%time%
|
timestamp
|
For example:
p4ftpd -t "[P4FTP(%h%)] submission by %u% from %c% at %t%"
(Optional) Configuring P4FTP to start automatically
You can configure P4FTP to start automatically when its host computer is rebooted.
UNIX computers
Edit the startup scripts according to the convention for your UNIX platform. If you intend to run P4FTP on a port other than the default, be sure to set the P4FTPPORT environment variable in the startup script.
Windows computers
To configure P4FTP to start automatically when its host computer is rebooted, create a service as follows:
- At the DOS command prompt, change to the directory where the file p4ftpd.exe is located. (This file is the one you downloaded from the Perforce web site.
- Create a copy of p4ftpd.exe named p4ftps.exe by issuing the following command:
cp p4ftpd.exe p4ftps.exe
- Create a service by issuing the following command:
svcinst CREATE -n "Perforce FTP Server" -e "fullpath/p4ftps.exe" -a
where fullpath indicates that you must specify the full location of the p4ftps.exe file. Windows displays the following results:
|
Creating Service
ServiceName=Perforce FTP Server
ExeName=c:\Program Files\perforce\p4ftps.exe
Autostart requested
|
(To verify the service has been successfully created, use the Services control panel.)
- To specify a host and port for the service, issue the p4 set command. For example, to ensure that P4FTP listens on port 1892, issue the following command:
p4 set -S "Perforce FTP Server" P4FTPPORT=1892
- To start the service manually, use the Services control panel. The service starts automatically when you reboot your computer. To view settings, use regedit to display \\HKEY_SYSTEM\CurrentControlSet\Services\SERVICENAME\Parameters
where SERVICENAME is the name you gave the service when you created it.
Creating Perforce users and client specifications
For each user who intends to access Perforce depots using P4FTP, you must create a Perforce user and a client specification on the P4FTP server computer. Perforce uses the client specification to determine the location of its client workspace, where it stores files on your client computer.
The following sections tell you how to create a Perforce users and client specification. Perform these steps from a computer where P4Win or the Perforce command-line interface (p4) is installed. You can direct P4FTP to create a client specification using a template, when a user that has not P4FTP client specification connects for the first time. For details, see "Specifying a template for undefined client specifications" on page 16.
Using P4Win (Windows only)
To create a Perforce user and client specification using P4Win, perform the following steps.
- Launch P4Win.
- Choose User>New... The Create New User dialog is displayed.
- Enter the name of the user you want to create and click OK. The following Perforce User Specification form is displayed.
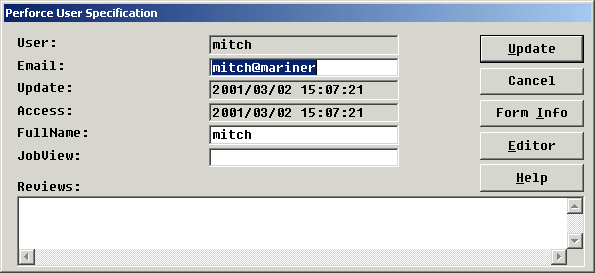
- Enter the required information and click Update. For details about form fields, click Form Info.
- Choose ClientSpec>New... The Create New Client dialog is displayed.
- Enter "ftp-" followed by the name of the user you created in the preceding steps. The following Perforce Client Specification form is displayed.
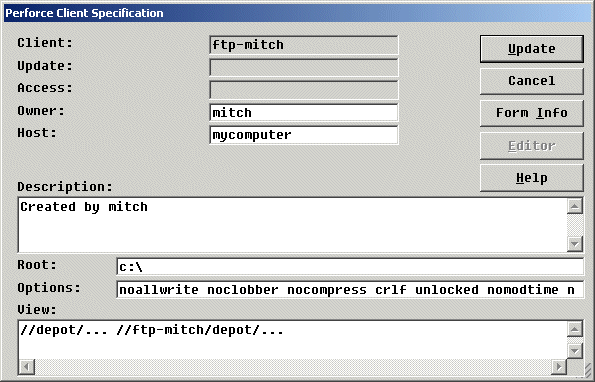
- Enter the required information. For details about form fields, click Form Info.
Note that, because you define the client workspace on the computer where P4FTP runs, you only need to correct the normdir option. Check the following entries:
Field
|
Description
|
|---|
|
Host name
|
Specify the name of the computer where P4FTP runs. For example:
mycomputer.mycompany.com.
|
|
Root
|
Specify the directory on your FTP server computer where you want the Perforce client workspace to be located. P4FTP uses the client workspace as temporary local storage.
Specify a location below the root directory, such as C:\p4client. To avoid cluttering the root directory of your client computer, do not use the root directory as the root of your client workspace. Choose a directory that is not used by another program or process.
|
|
Client options
|
Change normdir to rmdir. If your Perforce depot is located on a UNIX computer and your FTP client is located on a Windows computer, set the LineEnd option to win.
|
|
View
|
Specifies the mapping of the Perforce depot to your client workspace, to determine which files in the depot are visible to your client computer. Do not change this entry unless you understand Perforce client views and want to alter the mapping.
|
- Click Update to save your changes.
Using the P4 command-line interface (Windows or UNIX)
To create a Perforce user and client specification using the Perforce command-line interface, perform the following steps.
- At the command line, issue the p4 user command. Perforce launches a text editor and displays the Perforce User Specification form as follows.
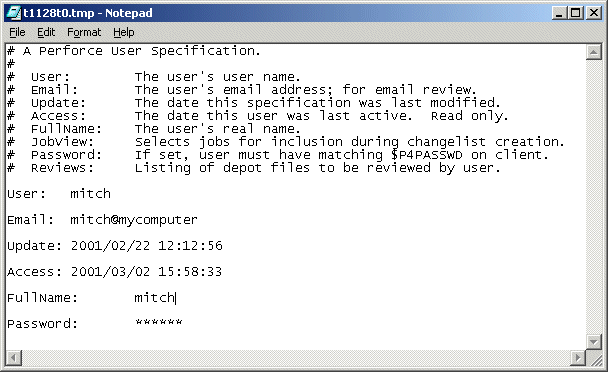
- Enter the information for the new user in the User, Email, FullName, and (optionally) Password fields.
- Save and close the file.
- At the command line, issue the p4 client command. Perforce display the Perforce Client Specification form as follows:
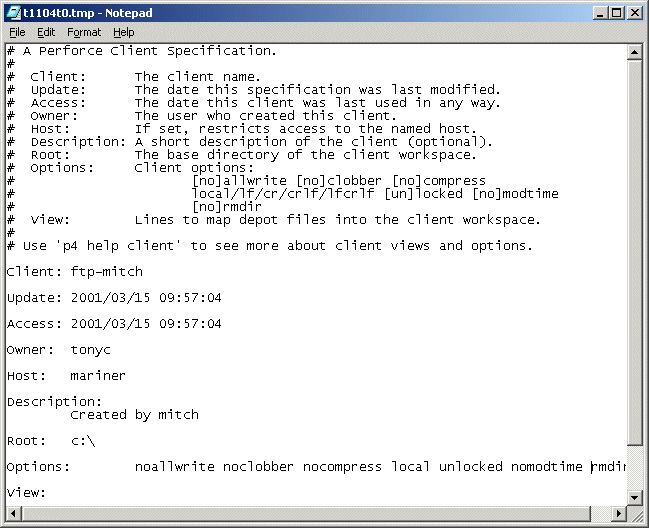
- Change the entries in the following fields:
Field
|
Description
|
|---|
|
Client
|
Specify "ftp-" followed by the Perforce user name.
|
|
Host
|
Specify the name of the computer where P4FTP runs. For example:
mycomputer.mycompany.com.
|
|
Root
|
Specify the directory on your FTP client computer where you want the Perforce client workspace to be located. Recommendation: specify a location below the root directory, such as C:\p4client. To avoid cluttering the root directory of your client computer, do not use the root directory as the root of your client workspace.
|
|
Client options
|
Change normdir to rmdir. If your Perforce depot is located on a UNIX computer and your FTP client is located on a Windows computer, set the LineEnd option to win.
|
|
View
|
Specifies the mapping of the Perforce depot to your client workspace, to determine which files in the depot are visible to your client computer. Do not change this entry unless you understand Perforce client views and want to alter the mapping.
|
- Save and close the file.
Specifying a template for undefined client specifications
To enable P4FTP to create an "ftp-" client specification for users that lack one, you can specify a template client specification. The first time a user that lacks an "ftp-" client specification connects, p4ftpd creates an "ftp-" client specification based on the client template. If you do not specify a template, P4FTP requires all "ftp-" client specifications to exist when it attempts to connect to the Perforce server.
The client template is an existing Perforce client specification. You define the client template as described in "Creating Perforce users and client specifications" on page 11. To ensure that client roots do not conflict, you can use macros in the client root field of the template. For example, the following client root definition directs P4FTP to create a client root directory using the format /data/host/user:
Root: /data/%h%/%u%
To ensure that client roots do not conflict, and to tailor the client view to meet your needs, you can use macros in both the client root field and the view field of the template. For example:.
|
Root: /data/%c
View:
//depot/main/... //%c%/main/...
//depot/user/%u%/... //%c%/%u%/...
|
These definitions ensure that each user's client root is unique and map a user-specific depot path into their client view, along with files in the //depot/main/... path.
To specify the client template that you want P4FTP to use, specify the -T flag when you start p4ftpd. For example:
p4ftpd -T ftp-myclient-template
Using config files
You can use Perforce config files to specify client options for p4ftpd. A config file is a text file containing specifications for Perforce client settings. (For detailed information about config files, see the Perforce Command Reference.) In addition to the standard Perforce client settings, you can specify the following P4FTP settings:
For details about these settings, see "P4FTP configuration options" on page 19. Note that p4ftpd obtains settings for P4USER, P4PASSWD and P4CLIENT from its FTP client and therefore ignores any config file entries for these settings. Any settings that you specify on the command line when you start p4ftpd override corresponding config file settings.
Verifying your installation
The following sections tell you how to verify that P4FTP is up and running. Note that, to perform these procedures, your Perforce server must be running and you must have started P4FTP as described in the previous sections.
Using the command line
To verify that you have successfully installed and configured P4FTP, issue the following commands to start an FTP client and connect with P4FTP:
- At the operating system prompt, start FTP by issuing the ftp command.
- At the ftp> prompt, issue the open command to connect to the host where P4FTP is running; for example, to connect to a host named "myhost" listening on port 1234:
ftp> open myhost 1234
The message "220 Perforce P4FTP FTP Server ready" is displayed.
- If prompted, log in.
- Display the contents of the Perforce depot by issuing the FTP ls command. To browse the depot and transfer files, use other standard FTP commands.
- To display information about commands supported by P4FTP, issue the help command.
Using a Web browser
To verify that you have successfully installed and configured P4FTP, perform the following steps to use a browser to connect with P4FTP:
- Launch a Web browser.
- In the URL window, enter a URL that specifies FTP protocol, the Perforce user, and the P4FTP host name and port.
For example, if P4FTP is running on mycomputer and listening on port 1850, enter:
ftp://mitch@mycomputer:1850
If you are using Internet Explorer, you must specify the user password (if any) in the URL in the following format:
ftp://username:password@hostname:portnumber
- If prompted, enter your password and click OK.
The browser displays the contents of the depot. The following figure shows a browser displaying a depot.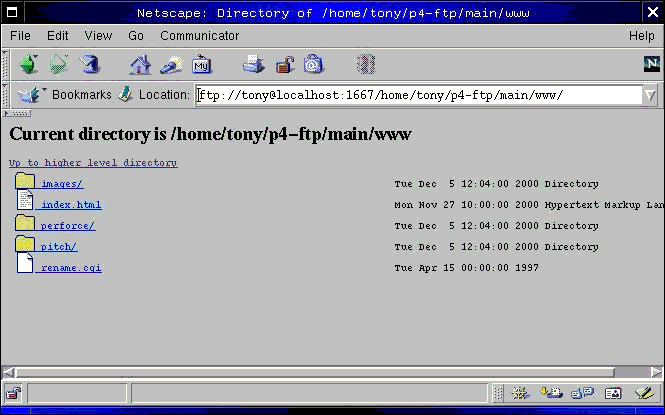
|
|
The following sections tell you how to configure Dreamweaver and Perforce with P4FTP so you can store and retrieve your web site files in Perforce depots.
Overview
The areas you must configure to use Dreamweaver with Perforce are as follows:
- Client workspace: an area of working storage on the computer where P4FTP runs. Must not overlap the local root.
- Local root: the directory where Dreamweaver stores its working copies of the web site files for editing.
- Host directory: the depot location of your web site files. The remote host directory must be the path to your Perforce "ftp-" client workspace plus any additional directories that you need to get you to the files you're working on.
For example, if you're running Dreamweaver on a Windows computer, P4FTP on a UNIX computer named ftpserver and the Perforce server on a UNIX computer named perforceserver, configure as follows:
- Client specification for "ftp-mitch"
- Host: ftpserver
- Client root: /usr/team/mitch
- Client view: //depot/... //ftp-mitch/...
- Dreamweaver configuration for a Web site named "marketing99"
- Local root: c:\dwroot\marketing99
- Host Directory: /usr/team/mitch/main/marketing99/
After you configure Dreamweaver and Perforce, you use Dreamweaver's "put" and "get" commands to store and retrieve web site files.
Creating web sites
To use Dreamweaver to create a web site that resides in a Perforce depot, perform the following steps:
- Choose Site>New Site... The Site Definition dialog is displayed.
- Create a folder on your computer where you want Dreamweaver to store the local copies of your web site files. (Example: C:\mywebsite).
- Enter the local settings for the new site, as illustrated in the following figure.
Important: in the Local Root Folder field, specify an existing directory that does not reside in your client root.
- In the Category pane, click Remote Info. The Remote Info pane is displayed.
- From the Access list, choose FTP. The following fields are displayed.
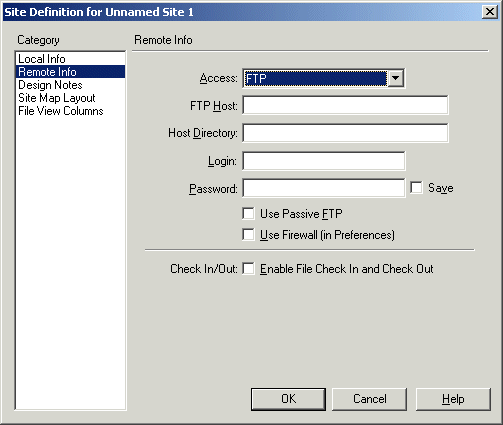
- Make the following entries.
Field
|
Description
|
|---|
|
FTP Host
|
Enter the name of the computer where P4FTP is running and the port on which it is listening for FTP requests. For example: myftphost:1234
|
|
Host Directory
|
The location in the depot to which you "put" (and from which you "get") your web site files.
Specify this directory using the operating system convention of the computer where you run P4FTP.
Important: this depot directory must exist before you attempt to "put" files to it using Dreamweaver. If the directory does not exist, you must create it by using Perforce or a command-line FTP client to add a file (any file) that resides in the directory.
|
|
Login
|
Enter your Perforce user name.
|
|
Password
|
Enter your Perforce password, if you have one.
|
Do not check Check in/Out.
- Click OK to save your entries.
After configuring Dreamweaver, you must create the depot location for your web site files before you can access the depot using Dreamweaver. One suggested approach is as follows:
- Using Dreamweaver, create your web site on your computer.
- Using operating system commands, copy the web site files to the location in your client workspace that corresponds to the depot location where you intend to store the files. (To display the mapping of your client workspace to the depot, use the p4 client command or P4Win.)
- Using Perforce (the p4 add command or P4Win), or an FTP command-line client, add the files to the depot.
You can now use Dreamweaver's "get" and "put" options to store and retrieve web site files in the depot.
Sample configuration
The following example provides Perforce and Dreamweaver settings for a web site stored in a Perforce depot in //depot/websites/site001.
Perforce settings for client workspace
- "ftp-" client root: C:\ftproot
- "ftp-" client view: //depot/... //ftp-myuser/depot/...
Dreamweaver remote settings for site001
- Host directory: depot/websites/site001
|